Update existing Analysis model from Structural model
The Update existing Analysis model from Structural model workflow provides options to handle changes that occur when you have already begun the design process of the structure. This workflow is designed for the situation where you receive a revised structural model when you have already begun the structural design process in your analysis model. We guarantee this workflow in combination with SCIA Engineer, but for other structural analysis software the success of this workflow heavily depends on their implementation of the SAF format.
This workflow allows you to compare two selected revisions of the structural model, review the changes, and select the specific changes to update your analysis model. The update process leaves all other relevant data untouched in your analysis model. For example, when there is a new opening in the floor slab, you can update your analysis model with this new opening and all the loads applied on the slab will be updated and kept according to the change. The main purpose is to keep the process of making changes transparent and reduce the amount of manual work needed for updating the analysis model with structural revisions.
Uploading Structural model revisions
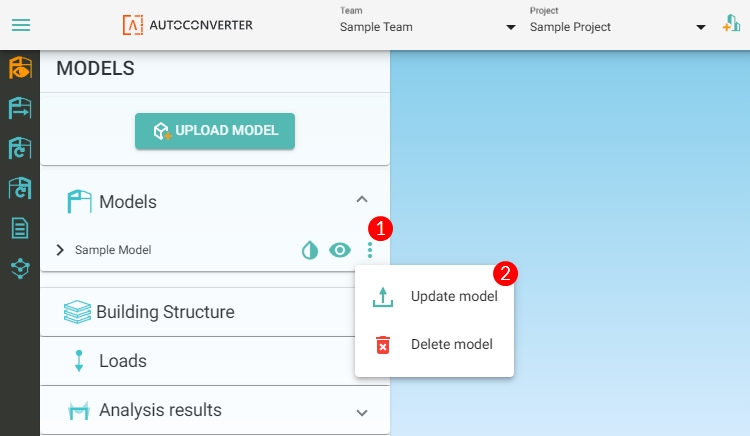
The revisions of the structural model (*.ifc files) can be uploaded in the Models panel (Figure 31) by clicking the three-dots (1) at the end of the line of the revised model you want to upload. After clicking the three-dots, select the option Update model (2) and select the IFC file on your local hard drive. The model will be uploaded and processed in the ALLPLAN AutoConverter. When the model is uploaded and processed you will see a Clock icon in the model row. Click the Clock icon to activate a specific revision in the 3D scene. Make sure you upload the revision to the correct parent model.
Compare Structural Model Revisions
The workflow icon can be found on the left workflow bar, third from the top (1- Figure 32), right below the Convert Structural model to Analysis model workflow button. Compare Structural Model Revisions is the first step of the workflow dedicated to the model selection and determining what should be compared between which revisions. The purpose of this step is to set correct comparison conditions and proceed to comparison.

How to set the model and comparison details? (Figure 32)
(1) Select the Update existing Analysis model from Structural model workflow.
(2) Select the structural model with at least two revisions. Models without at least two revisions are not offered in the drop down.
(3) Select the active revision in the scene. Usually, it is the last revision uploaded.
(4) By clicking on the action arrow, you can expand the disciplines of the model available. Set the activity of disciplines as you wish for the comparison. Usually, same discipline activity is set as in Structural to Analysis workflow.
(5) From the drop-down menu, select the filter you want to use for revision comparison. Usually, it is the same filter as was used to convert the model from structural to analysis.
(6) Select the second revision you want to compare. (The first revision for comparison was selected in step 3.)
(7) Property filters, in general, provide you with the option to determine which attribute will be compared. Filters are explained below in detail.
(8) When everything is set, you can click on the Compare button and proceed to the next step.
How to set and store property filters?
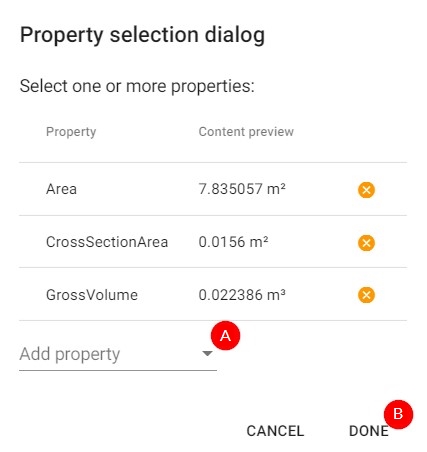
Figure 33: Selecting specific attributes for comparison (1) Pencil icon: Click on the pencil icon for opening the attribute selection window (Figure 33). Select specific attribute(s) you would like to compare exclusively. You can add one or more properties (A), then click the Done button (B).
(2) Filter (drop down): Select the already existing and saved filter in the drop down selection (Figure 34).

Figure 34: Setting the property filter (3) Clone icon: Click on the clone icon for creating a copy of the existing property filter. Existing filters can be copied, adjusted and saved as new with the clone command.
(4) Rename the filer: By clicking on the green "A" icon you can activate the renaming system. When activated, rename the filter in row (2) and then click the diskette icon to save the new name.
(5) Trash bin icon: Clicking on the trash bin icon will delete the currently selected property filter.
(6) List of selected attributes: In the list, you can see selected attributes from step (1). By clicking on the X icon you can remove specific attributes from the filter. This action is automatically saved.
Best practice:
-
In case the workflow icon is in the disabled state, check your subscription level.
-
If you do not see a revised model to select, it is likely because you do not have a structural model with at least two revisions uploaded.
-
When you are about to update the already existing structural model, make sure you are uploading the model as a revision to the correct parent model, team, and project.
-
Use the same activity of disciplines for revision comparison as you used for conversion from structural to analysis.
Review and Select
After clicking the Compare button, ALLPLAN AutoConverter will process the revision comparison according to your settings. The comparison result is represented in the left workflow toolbar in a list, visually highlighted in the 3D scene and also available in the table overview. The Modified properties are shown in orange color, light green is for Deleted objects, dark green is for New objects, and blue is for Modified objects. The main purpose of this step is to review the result of the comparison, select relevant changes for you as a structural engineer, and proceed to the next steps of the update with the selected changes (Figure 35).
-
Orange: Modified properties. Example: Changed the thickness of the slab and its volume.
-
Light green: Deleted objects. Example: Removed column.
-
Dark green - New objects. Example: Newly added column.
-
Blue: Modified objects. Example: Newly added opening in the slab.

Figure 35: Review and select changes
Review and select overview (Figure 35):
(1) Changes review part: Here you can see all the changes after the revision comparison. Changes are logically filtered in this view. For example, a new opening in the slab is represented in Modified objects (Blue) and not presented as a changed property of a slab (Volume). For a full overview open (5) Table Overview.
(2) Each part can be expanded. With that, you can see specific changes one after another.
(3) Toggle the transparency of the structural model for a better overview of where are changed, deleted and new objects located.
(4) Select changes by clicking on the selection box. Selected changes will be used for the update of the selected analysis model (6). Changes can be selected in the 3D scene and also in Table Overview. When no selection is made, all changes are used for the update.
(5) Table Overview: Click to open the table overview (also see Figure 36).
(6) Analysis model selection (drop down): Select the analysis model you want to have updated.
(7) Select the revision of the selected analysis model you would like to use for the update. Usually, the last revision is updated with the latest changes.
(8) Visibility of analysis model (toggle): Toggle ON and OFF visibility of analysis model.
(9) Use selection and move to next step: Once you select changes for the update and select the analysis model, proceed to the next step.
Table Overview (Figure 36):
The Table Overview provides you with all details about what was changed.
Selection done in Table Overview works the same was as a selection in Review and in the 3D scene. The Table Overview consists of the following components you can use (Figure 36).
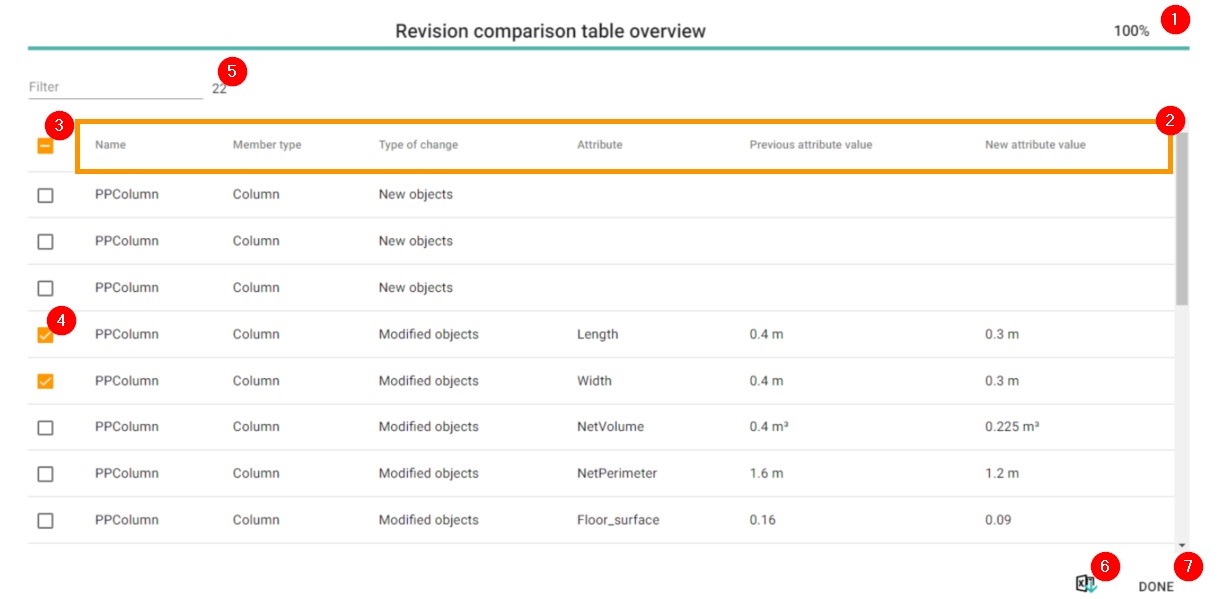
(1) Progress bar: When Table Overview launched, please wait until the table is fully processed.
(2) Table headers:
Name - entity name
Member type - slab, column etc.
Type of change - New, Deleted, Modified object or property (based on grouping mentioned above)
Attribute - what attribute was changed (if any, not relevant for New and Deleted objects)
Previous attribute value - the value of an attribute in lower revision
New attribute value - new attribute value in the higher selected revision
(3) Select all check boxes: Marks all of the check boxes. Use this when you want to proceed with all changes or most of them.
(4) Select specific change: Marks only specific changes as changes you want to use for the update of your analysis model.
(5) Filter: Write down keywords in the Filter field to reduce the number of rows based on keywords. Every row where the keyword is present will be shown. For example, NetVolume could be used if you are interested in volumetric changes. Attribute names are IFC specific and NetVolume might not be presented in your IFC. Check the structural model attribute structure first.
(6) Export to excel (.xlsx): You can download the complete table on your hard drive in .xlsx format. Filter (5) is not taken into account and the complete table is always downloaded.
(7) Done: When you have finished selecting changes, click Done to close Table Overview.
Once you have selected the specific changes and the analysis model you would like to update, you can click Use selection and move to next.
Note: In case the Compare button is in the inactive state, check if you have selected two revisions (Figure 32 - 6).
Recognize, Align and Update
The following steps, including saving the model, are the same as for Structural to Analysis model conversion. It is recommended to save the model as a revision on Bimplus.
When performing Review and Select, verify the settings and check for changes made to materials, cross-sections, and members. Adjust the Recognizer settings. Adjust or map them if necessary.
The recognition and alignment, in this case, recognize only the selected changes. The rest of the structure is kept from the aligned model, and in the alignment process the newly recognized objects are connected to the existing structure. All secondary objects, like loads and supports, are kept for the changed and modified objects. You do not need to model them again in SCIA Engineer.
In alignment, you can use all alignment modes (align model, partial alignment and alignment per groups) as mentioned in Align Elements.

